During my time as editor of the brass and wind band catalogues at Faber Music and now with my own company Timbercroft Publishing, I was sent quite a few compositions and arrangements for consideration for possible publication.
Presenting a score to a prospective publisher is no different to submitting a CV to a potential employer – you only have a few seconds to make that first impression.
Good looking
Scores are as much about the aesthetics as it is the content.
If your score is neat and tidy, looks well-laid out on the page and is easy to read, then someone is going to spend more time looking at it than something that arrives in loose sheets, or stapled in the top left hand corner or a score that is plastered with clip art.
So what are some helpful tips to ensure your next opus gets more than just a quick look of rejection?
Right from the start the look needs to catch the eye...
Some simple tips before getting started:
Before you start work on any score make sure you have created the necessary folders on your computer and make sure they are in an organised manner.
One piece may soon becomes ten or twenty, and if you have a score and parts for each and you need to find them in a hurry they will need to be all sitting neatly somewhere ready to click on!
It is also worth getting a record keeping system in place right from the outset and for each piece.
Accounts and licenses
You will need to have your accounts, your licenses, your print runs and your sales history to hand.
No matter how small you start, take time to get all the little details right from the beginning – and certainly do not be in a rush to get things selling.
Get your name, your logo, a numbering system, a house style and your fonts right on the very first piece and stick to it – you will spend many months re-doing things so they all look the same if you do not.
Score layout:
Score preparation is everything.
It will save you a colossal amount of time when you come to extract the parts later, and remember that proof-reading and editing takes longer than you think.
In your haste to get the piece out, whether for a rehearsal or a sale, you may find you have made some mistakes and reprinting obviously takes longer and will cost you money.
Whether you use Sibelius, Finale or any other music notation software make sure you amend the default settings and set them to a standard you will use on all your pieces.
I recommend that you use the same font throughout – you can embolden or italicise, you can change to point size for different elements on the page but I suggest that you NEVER mix your fonts.
What size and shape for your score?
In brass bands, we are used to seeing landscape full scores.
They used to be wire-stitched (stapled), but now we tend to see them spiral-bound or even comb-bound.
If you prefer to set you score this way, then that is perfectly fine, but I always prefer to set my scores in portrait.
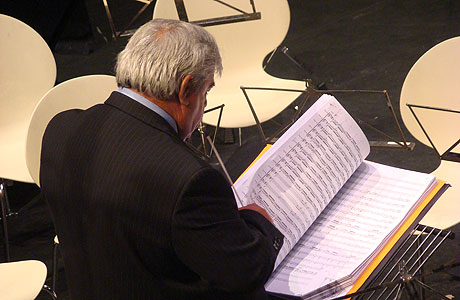
Scores can come in all shapes and sizes...
Why portrait?
The answer for me is quite simple – you can get more staves per page, and have more space between them!
Older scores, those that originally set the trend for landscape format, generally had seventeen staves (eighteen if there were two percussion lines).
Contemporary scores tend to have a minimum of twenty staves, and more now that we tend to use a lot more percussion in our music.
Layout
My default settings for a portrait score layout are 15mm page margin all round, with a staff size set to 3.5.
I also set the staff margins for the top and bottom of the page to 11 and 5.
This is the standard size for Faber Music’s brass band house style, and for those that have used scores published by Faber I think you will find them clear and well laid out.
Starting your score:
Do not cram too many bars on to one page.
You may think it saves on paper (and printing) but will be a nightmare for a conductor to use.
I tend to leave the Object Rulers switched on.
This is the indication of the distance your text, dynamics, rehearsal marks and notifications will appear from each staff line.
Wherever possible, try and keep the elements the same distance each time you add them – it will take some getting used to, but it will help when you come to extract parts.
Copyright
If your work is original or an arrangement of a public domain work, then make sure you have added a copyright line to your piece.
If you have been given a licence to make and arrangement of a piece by another publisher, then it is likely that they will have given you the exact wording to add to your score and parts – make sure you do this, and do not change the copy they have given you.
If you have not been given permission to do an arrangement STOP WHAT YOU ARE DOING!
Your arrangement is going to be illegal!
Entering the notes and adding technique and expression:
Too often I have heard that; “Sibelius does it all for me, why do I need to edit my work?”
Well, Sibelius is just a piece of software, so although it does have sophisticated algorithms to do with layout and positioning, it still needs human intervention to make it look better on the page.
Most of the ground rules are set as default by your music notation software, and in most instances no correction is necessary.
However, it is most important that you make sure that you have enough space between staves to apply instructions, dynamics and phrasing without crashing them on the page.
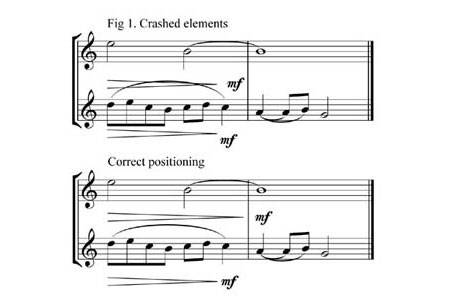
How to stop crashing...
Occasionally you may need to drag a line down to create the space, but this should only be done rarely.
Stems:
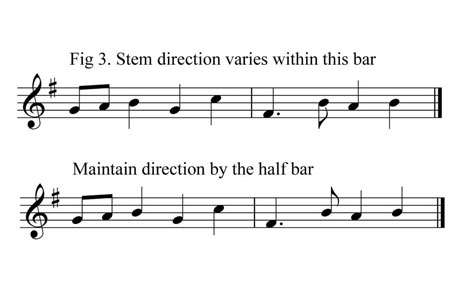
You may want to flip the note stem on some notes in the middle of the stave as, technically, the stems direction is determined by context.
If the stem direction varies throughout the bar, it is best to maintain the stem direction as part of the same beat or half bar.
This may seem pointless to some, but it does make a difference to the way the music looks on the page.
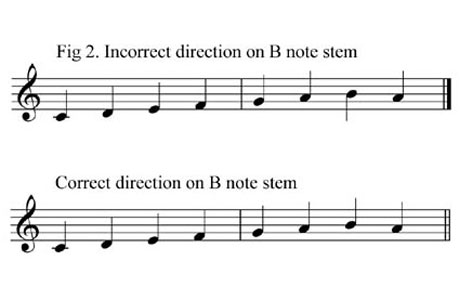
Stem research: Getting a single note right
Stem Research: Getting all the notes right
Beams:
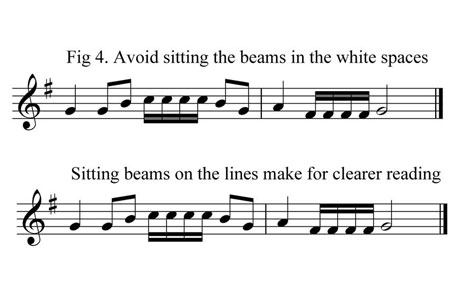
If your groups of notes have beams, make sure that the beam sits on or below a line, never centred in the middle of a space.
Those narrow white spaces may disappear at small stave size or with poor reproduction.
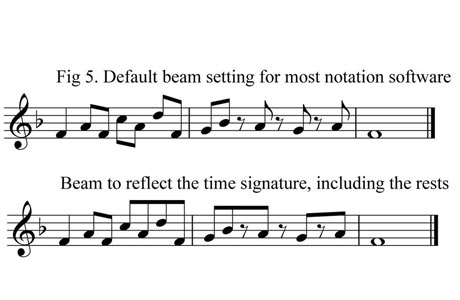
Generally speaking, beams should be set to reflect the time signature, as the notes are clearest to read when they are subdivided in to small units.
Beams of light....
You can also beam across rests in order to identify the beat more easily.
The right cross beam
Rests, beat structure and syncopation:
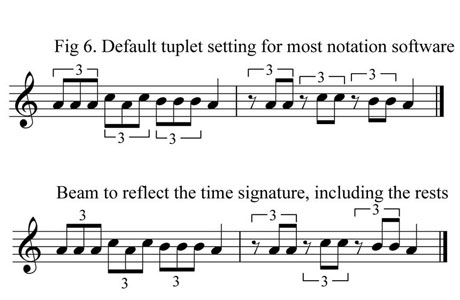
You should also group rests according to the metre.
There are two simple rules to consider: rests in metres of two and four beats (2/4, 4/4, 2/2 or 6/8, 12/8) divide to expose the middle of the bar, whereas rests in metres of three beats (3/4, 3/8 or 9/8) should show all the beats.
Sustaining notes or ties across beats should maintain the beat structure, as should syncopated writing.
Make sure that all the expressions and techniques are attached to the correct notes and parts.
How often have you seen a floating hairpin or dynamic marking that has no bearing on your part whatsoever?
Making sense of rests
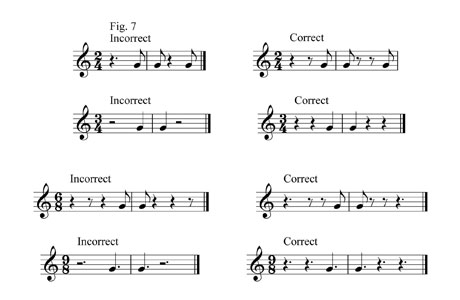
Making sense of beat structure
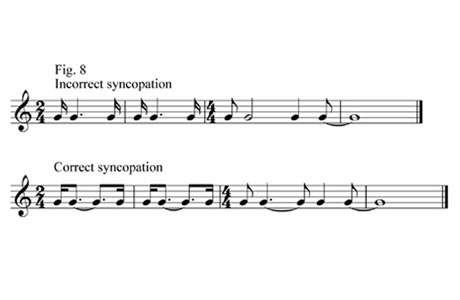
Making sense of syncopation
Dynamics:
As an editor, I always pay particular attention to dynamics and where to place them.
It is important to make sure that there is clear indication of the dynamics at all times, so if the part has mezzo-forte marked and then a crescendo, make sure you indicate what the new dynamic is.
If you mean it to be forte, say so!
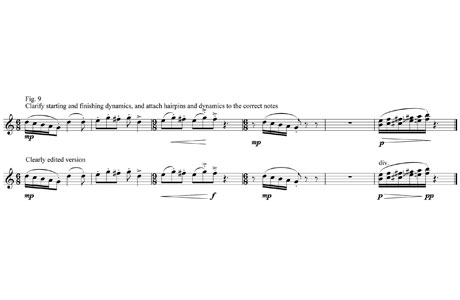
Getting everything right makes it easier to read - and play...
If a part has a diminuendo mark the destination dynamic at the end of it.
Above, make sure that your hairpins for crescendos and diminuendos start and stop on the right notes (and wherever possible avoid writing cresc. or dim. on the part).
Spacing:
You may need to occasionally reset the spacing in your score – you can use a simple command to do this (Ctrl-Shift-N in Sibelius!).
Of course, the most important tip is to constantly save your work!
Don’t just rely on your hard drive; make sure you have a couple of flash drives handy.
Editing before part extraction:
Do not rely on your music notation software’s playback – you will need to print off the score and look at the notes/chords you have written.
Default playback on your software will give equal weight to all the sounds and therefore not give you the benefit of spotting balance issues.
Be methodical, page by page or part by part – if you spot an error mark it clearly with a red pen.
This will help you when you amend your score on screen.
Check some of the lines that have big ranges and make sure they are playable.
Make sure you have provided some chance for rest – it may also help when you extract the parts for page turns.
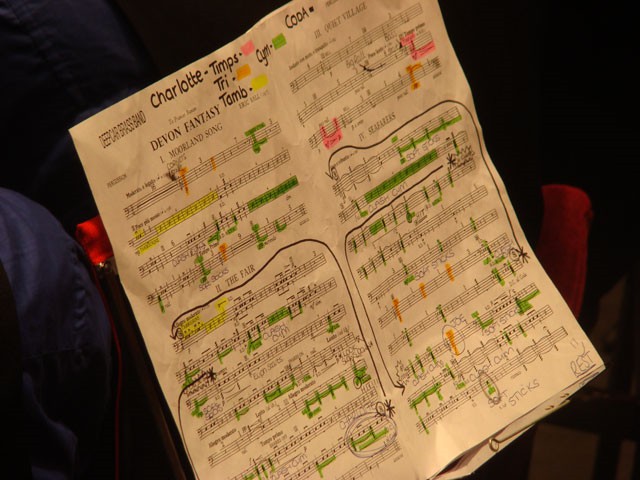
Old works can be very difficult to read...
Not thinking ahead can cause some major issues when you come to the final part extraction.
If you have asked for a part to be muted, make sure you have indicated when it should be open next.
With regards to percussion, if you are using multiple instruments for each percussion line it is worth indicating what instrument is to play by putting it in boxed text immediately above the line to be played.
You do not need to indicate on the score ‘to tam-tam’ if the player is changing instruments, but you may need to indicate this in the part itself.
Only when you are completely happy with your score, and have ensured that instruction, dynamics, tempi, rehearsal marks etc. are all present and correct should you consider extracting parts.
There are many wasted hours in band rooms all over the world each week because someone has to ‘check a note’.
Part extraction:
I would suggest you set all part for extraction to a stave size of 6pt.
Never have more than 10 or 11 staves per page.
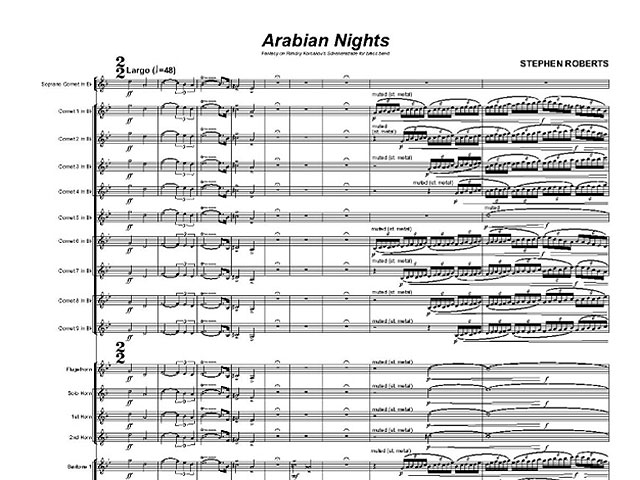
Nine Arabian bars....
If you have done your score preparation properly, then all parts will have the dynamics, expression and direction elements in the correct place, attached to the right bar and notes.
Remember, if you have put in instructions they will attach themselves to a specific bar.
Make sure that you move these within the parts to avoid instances where a direction such as “muted” is in a bars rest on its own with multi-rests either side!
Make sure that if you put in an appropriate page turn where necessary.
It is important that the performer can lean in, turn the page, sit back and begin playing again in the time you have allowed them to do so!
It is always a good idea to provide music cues in parts, particularly after (or during) lengthy numbers of bars rests.
This is not always needed of course and, occasionally, you can simply put a note of which instrument to look out for under a multirest.
Recommended reading:
Music notation is an art form and therefore complicated, and you cannot rely on your software to do all if it for you.
There are a few of books on the subject, but without a doubt the best on the market is 'Behind Bars: The Definitive Guide to Music Notation' by Elaine Gould.
It is a colossal 704 pages, with over 1,500 music examples.
It is published by Faber Music (ISBN: 0-571-51456-1) and retails at around £65, although it is available at substantially less than that on Amazon.
Phillip Littlemore
Phillip Littlemore has over twenty years experience in music and book publishing.
A graduate of the Guildhall School of Music, he went on to work for Boosey & Hawkes before spending five years as Marketing & PR Manager for The Guinness Book of Records.
From 1998 to 2011, Phillip was the Sales & Marketing Director for Faber Music, where he also had editorial responsiblity for the wind and brass band catalogues.
He is now Director of Timbercroft Marketing Consultancy, a business that specializes in working with firms in the music, publishing and media industries.
To find out more go to: http://www.timbercroftpublishing.com/


